A Step-by-Step Guide to Creating Stunning Light-Painted Portraits
Light painting is an exciting and creative photography technique that allows you to transform ordinary portraits into extraordinary works of art. You don’t need fancy equipment to start—just a bit of imagination and some basic tools. This guide will walk you through the process of creating light-painted portraits, offering simple tips to elevate your photography.
What Is Light Painting?
At its core, light painting is an extension of the photographic process. Photography, derived from the Greek words for “light” and “drawing,” means “drawing with light.” Light painting takes that idea further by allowing you to use various light sources to “paint” over your subject or background during a long exposure. The result? A stunningly creative and dynamic portrait that captures both the light and the moment.
You can use anything from flashlights, LED lights, and sparklers, to more specialized tools for light painting. The possibilities are endless, and you can even DIY some of your light sources using materials around the house.
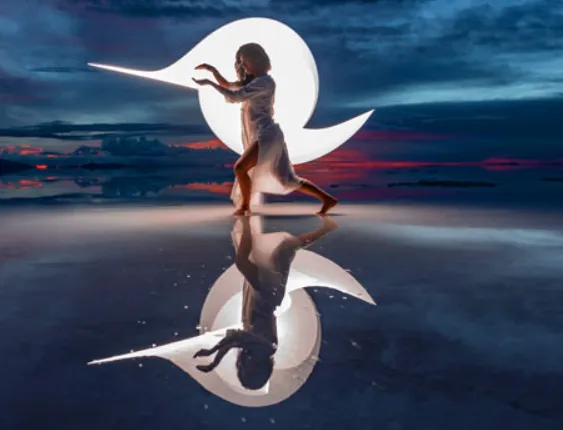
What is a Light-Painted Portrait?
A light-painted portrait is simply a photo of a person created using light painting techniques. The concept allows you to illuminate the subject, the background, or both with light, creating dramatic, glowing effects that make the image stand out. It’s fun, and the best part is that models often get excited about the results, as it’s a collaborative process that leads to surprising outcomes.
Essential Equipment
Here’s what you’ll need to get started with light painting:
- Camera with manual settings and a bulb mode or a maximum shutter speed of 30 seconds
- Tripod – This is essential to keep your camera steady during long exposures
- Light Source – Anything that produces light, such as flashlights, LED lights, or even sparklers
- Remote Trigger (optional but helpful) – This allows you to take photos without physically touching the camera
- Headlamp – Handy for moving around in the dark without disturbing the setup
- Model – A willing participant to pose for you!
Optional tools include a speedlight, light painting brushes, and colored gels for added creativity.
Step 1: Find a Dark Location
The first thing you need is a dark environment. Whether you’re indoors or outdoors, ambient light can interfere with your light painting, so the darker the space, the better. Find a location with minimal light pollution—whether it’s a basement, an outdoor area away from streetlights, or a room with all the lights off.
The key is to ensure that only the light you introduce will appear in the photo, which means no unwanted light spilling into your scene. A darker background will make the light you paint stand out more effectively.
Step 2: Set Up Your Camera
Now that you’ve chosen a location, set up your camera. Here are some recommended settings to start with:
- Mode: Manual
- ISO: 200 (you can adjust based on the lighting)
- Aperture: f/5.6
- Shutter Speed: 15-30 seconds (you may need to adjust depending on how dark the scene is)
- Focus: Manual (set it before starting the painting process)
You’ll need to experiment with these settings based on the level of ambient light in your scene. A test shot will help you determine if the exposure time or ISO needs tweaking. If the background is too bright, you may need to reduce the exposure time or adjust the aperture to make the background darker.
Step 3: Focus in the Dark
Focusing can be tricky in the dark, as your camera’s autofocus won’t work without sufficient light. Here’s a tip: Use a flashlight to illuminate your model while focusing, or ask your model to shine the light on themselves. Once the subject is illuminated, switch to manual focus and use Live View (if your camera has it) to zoom in and get sharp focus on the subject. It’s a good idea to double-check the focus after each shot to ensure it hasn’t shifted.
Step 4: Start Light Painting
Once your camera is set up and focused, it’s time to start light painting. You have two options:
- Single Exposure: You can complete the entire light painting in one long exposure. This method requires careful planning, as you need to move the light source smoothly through the scene without making any mistakes.
- Multiple Exposures: For more flexibility and fewer mistakes, you can take several exposures and combine them later in post-processing. This method allows you to adjust each shot individually.
If you want the background or subject illuminated in different ways, taking multiple images gives you more options to blend in Photoshop or another editing software later on.
Step 5: Experiment and Refine
Light painting is an experimental process. You’ll need to try different techniques and lighting styles to get the results you want. The key is to keep testing until you achieve the effect you desire. You can use various light sources—like flashlights or colored gels—and experiment with different movements and speeds to create unique patterns.
For example, if you’re using a colored light, try moving the light slower or faster, depending on the desired intensity. If you’re working with multiple light sources, you can layer the effects to get the perfect balance.
Editing Your Light-Painted Portraits
After capturing your light-painted images, it’s time to edit. Here are some editing tips:
- Adjust the Contrast: Use the editing software to fine-tune the contrast, ensuring that the light painting stands out against the background.
- Retouching: You may want to smooth out the skin or add more details to the model’s face. Software like Lightroom or Luminar Neo can help with skin retouching.
- Enhance the Colors: Use tools to boost the color intensity of your light painting. If you used gels or colored lights, this is where you can make those hues pop.
Conclusion
Creating light-painted portraits is an incredibly fun and rewarding process that combines creativity and technical skill. With just a few simple tools and some experimentation, you can create stunning, unique portraits that are unlike anything you can capture with a smartphone.
Remember, the key to success with light painting is patience and practice. So, grab your camera, pick a model, and start experimenting with light to produce your next masterpiece!