Mastering HDR in Lightroom: A Comprehensive Guide to Merging and Editing
HDR (High Dynamic Range) photography is a powerful technique that allows photographers to capture more details in both the bright and dark areas of an image. But when used incorrectly, HDR can lead to overprocessed, unnatural images. In this guide, I’ll walk you through the steps to use Lightroom’s Merge to HDR feature effectively, ensuring you achieve realistic, detailed results without overdoing it.
What is HDR Photography?
In simple terms, HDR photography is used to handle scenes with extreme contrast, where the camera can’t capture both the bright highlights and dark shadows in a single shot. By capturing multiple exposures and merging them, you can preserve the details in both the light and dark areas of the image.
Before the digital era, photographers like Ansel Adams used techniques like the Zone System to manage tonal range in their images. Today, HDR photography works similarly but digitally, allowing you to create a detailed image by merging bracketed exposures.
When Should You Use HDR?
HDR is most useful when you encounter scenes that have high contrast and when you need details from both highlights and shadows. Here are situations when HDR is beneficial:
- High-contrast scenes: Think of interiors with bright windows or landscapes at sunrise or sunset.
- Static subjects: Buildings, landscapes, and still life objects are ideal for HDR as they don’t move between exposures.
On the flip side, HDR isn’t needed for:
- Low-contrast scenes: Your camera can handle these without the need for HDR.
- Fast-moving subjects: HDR can cause ghosting if subjects move between shots.
- Scenes where you want dramatic shadows: Shadows add depth and atmosphere, and HDR may ruin this effect by lightening them too much.
The Dangers of Overusing HDR
While HDR can be incredibly useful, overusing it can lead to unnatural results. Flattening shadows and highlights entirely, for example, will rob your image of depth and contrast. The key is to apply HDR carefully, maintaining a natural look that enhances the scene without overprocessing.
Getting Your Camera Ready for HDR
Before you start shooting, ensure that your camera settings are optimized for HDR. Here’s a quick checklist:
- Shoot in RAW: This will give you the most flexibility during post-processing.
- Use Manual mode: This helps maintain consistent depth of field across exposures.
- Adjust only the shutter speed: Keep the aperture fixed to maintain consistent focus.
- ISO: Set it to the lowest possible (100–200) to reduce noise.
- Use a tripod: It’s crucial for precise alignment, especially for merging exposures.
- Bracket exposures: Take at least three shots, spaced 2 stops apart, for maximum tonal range.
Shooting Bracketed Exposures
To create a good HDR image, you need to take bracketed exposures — shots at different exposure values that capture both the lightest and darkest parts of the scene. A typical bracketing setup looks like this:
- Base exposure (middle of the histogram)
- Underexposed shot (darkest)
- Overexposed shot (brightest)
The idea is to capture the full range of tones in the scene, ensuring no important details are clipped. Use your histogram and highlight warnings to help determine when to stop shooting.
Merging HDR in Lightroom
Once you have your bracketed exposures, it’s time to merge them in Lightroom:
- Import your bracketed shots into Lightroom and select the images you want to merge.
- Flag your images for easy identification in the Library module.
- Right-click on the selected images and choose Photo Merge > HDR.
- In the HDR Merge Preview dialog, choose your settings:
- Auto Align: Always check this to correct any minor shifts in alignment.
- Auto Tone: Optional, as it’s better to adjust tones manually later.
- Deghosting: Select this if there’s movement between exposures (e.g., wind or moving subjects).
- Click Merge: Lightroom will process the exposures into a single 32-bit DNG file.
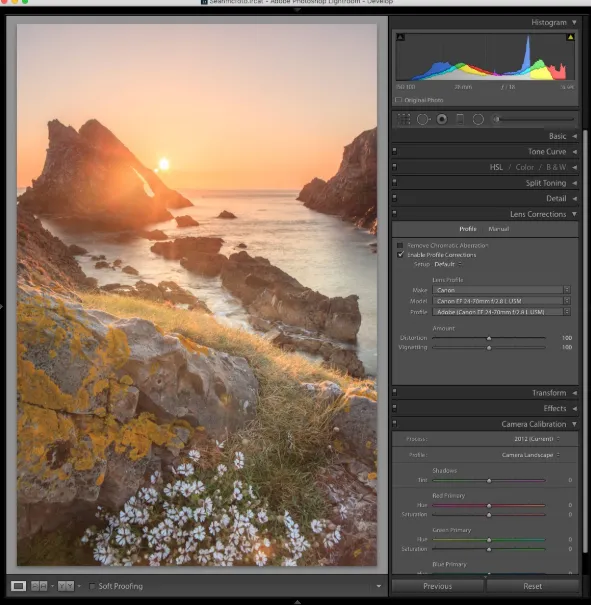
Editing Your HDR Image
Once Lightroom has merged your exposures, it will create a 32-bit DNG file with all the tonal details preserved. This file may look flat at first, but that’s your canvas for adjustments.
Global Adjustments:
- Exposure, Contrast, Highlights, Shadows, Whites, Blacks: Start by adjusting these settings to balance the image.
- Tone Curve: Use the tone curve to fine-tune contrast and create a more dynamic image.
Local Adjustments:
Once the global adjustments are made, focus on local edits. For example, you can use gradients or radial filters to brighten dark corners or pull down highlights from bright windows.
Remember, subtlety is key. Overdoing local adjustments can result in an unnatural look. Aim for a natural balance of light and shadow.
HDR vs Single RAW Processing
HDR excels when you’re trying to recover detail from both shadows and highlights, which would otherwise be lost in a single exposure. Here’s a comparison:
- HDR Merge: Provides excellent detail in both highlights and shadows, low noise, and more editing flexibility.
- Single RAW: You can get good results, but some highlight and shadow detail will be sacrificed. Editing flexibility is limited.
Example: Compare a single RAW processed photo with an HDR merged photo. The HDR version retains more detail in the shadows and highlights, offering a clearer, more balanced image.
Conclusion
HDR in Lightroom can be a powerful tool for enhancing high-contrast scenes, but it’s not always necessary. Use it wisely for situations where your camera can’t capture the full range of light in a single exposure, like sunrise or sunset landscapes or interiors with bright windows. Be mindful of overprocessing, as it can lead to unnatural results. By following these steps, you can master the art of HDR and create stunning, realistic images that maintain depth and detail.