Mastering Double Exposure Photography: A Step-by-Step Guide
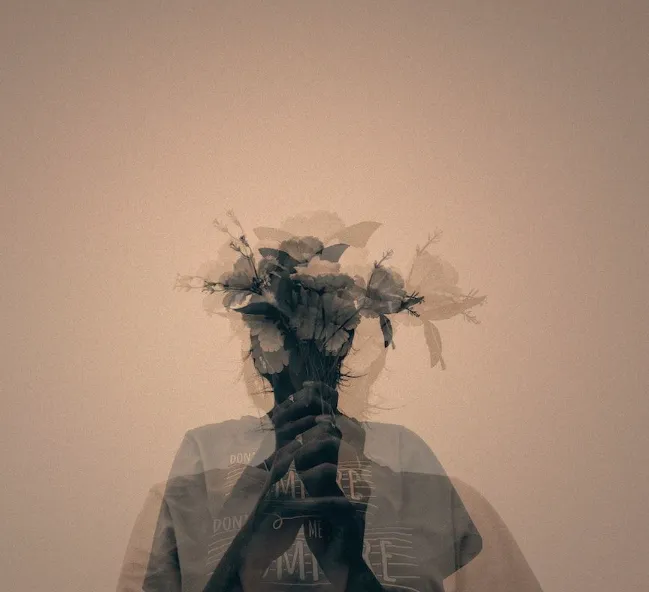
Double exposure photography allows you to combine two distinct images into one visually captivating shot. Whether you’re new to this technique or you’ve tried it and weren’t satisfied with the results, this guide will walk you through the process of creating stunning double exposure photos, either using your camera’s in-built settings or post-processing software like Luminar Neo and Photoshop.
What Is Double Exposure Photography?
Double exposure is a creative photography technique where two exposures are combined into a single image. Traditionally, this was achieved in-camera, but with modern editing software, you can now easily merge multiple images during post-processing. The key to a successful double exposure is how well the two images complement each other.
While it’s possible to achieve double exposures using in-camera settings, post-processing offers greater flexibility. If you’re unfamiliar with how to use either method, keep reading to learn both options.
Why Try Double Exposure?
Double exposure is a fantastic way to break free from traditional photography and push your creative boundaries. If you’re feeling uninspired or want to create something unique, double exposure photography can provide that spark. It’s an excellent way to capture iconic subjects or locations in a completely fresh way, combining different elements that might not be possible in a single shot.
It’s also simply fun to experiment and see what you can create. Whether you’re trying to depict a surreal landscape, create mood, or tell a story through your photos, double exposure gives you a versatile tool to do so.
Creating Double Exposure In-Camera
Many modern digital cameras, and even some smartphones, have built-in double exposure modes. These allow you to capture and combine two images directly in the camera. If you’re unsure how to enable this mode, check your camera’s manual or settings.
Here are a few tips for creating double exposures directly in-camera:
- Choose Strong Subjects: For the first image, select a subject that has strong backlighting, such as a silhouette. This creates a solid shape, which works well for overlaying other images.
- Add Texture for the Second Image: Your second image should have strong texture or interesting details. This could be anything from a landscape to an abstract texture. The idea is to overlay this on top of the subject to create the double exposure effect.
- Experiment with Exposure Settings: Adjust your exposure settings for each image. Some cameras offer options to blend exposures in different ways (e.g., light, dark, or adding contrast). Try experimenting with these options to achieve different results.
- Use a Camera with a Blending Mode: Some cameras, like Canon and Nikon, allow you to choose different blending modes (Multiply, Overlay, etc.). Try different modes to see which one works best for your images.
- Check for Background Distractions: When positioning your subject, ensure that there are no distracting elements, like trees or poles, appearing where they shouldn’t. Move your subject or change your camera angle to get a clean shot.
By experimenting with angles, exposures, and blending modes, you can create unique in-camera double exposures that add a whole new layer of creativity to your photos.
Creating Double Exposure in Post-Processing
If you prefer more control over your double exposures, post-processing software like Photoshop, Luminar Neo, or Affinity Photo will allow you to blend images at your convenience.
Here’s how to create a double exposure in post-processing:
- Choose Your Base and Overlay Images: Select the base image first. This will typically be your primary subject, such as a portrait or silhouette. Then, select an overlay image that adds texture or pattern, like a landscape, sky, or abstract design.
- Prepare Your Images: Process the base image to enhance its color and contrast. The overlay image should be exported as a high-quality JPEG.
- Combine Images in Software:
- Luminar Neo: Add your base image and then layer the overlay image. Resize and position the overlay image to fit your composition. Experiment with blend modes (such as Multiply, Screen, or Soft Light) to see how they affect the final result. You can adjust the opacity of the overlay image to control how much of the base image shows through.
- Photoshop: Use the layering and mask features to combine your images. Apply blend modes to achieve various effects. Adjust the opacity to refine the strength of the overlay and use layer masks to hide or reveal specific parts of the image.
- Refine the Image: Once you’ve combined the images, refine the effect. You can adjust the brightness, contrast, and sharpness. Use layer masks to control which parts of the overlay image are visible, allowing you to highlight certain areas while leaving others subtly blended.
- Final Adjustments: Play around with color grading or convert your image to black and white for a more dramatic effect. Fine-tune the details until you’re happy with the composition.
Tips for Successful Double Exposures
- Select Complementary Images: Choose images that work well together. A portrait with a landscape, or a detailed texture with a clean background, often makes for the most striking combinations.
- Silhouettes Work Wonders: Silhouettes make excellent base images for double exposures because they provide a clear outline that lets the overlay image shine through.
- Blend Modes Are Key: Experiment with different blend modes to see how they affect your images. Multiply, Overlay, and Soft Light are popular choices, but don’t be afraid to explore others.
- Use Masks for Precision: Use layer masks to control which areas of the overlay image are visible. This gives you more control over the final look and allows for a more polished result.
- Play with Opacity: Adjusting the opacity of your overlay image can give you more control over the intensity of the double exposure effect. Lower opacity can create a more subtle effect, while higher opacity makes the second image more prominent.
Conclusion
Double exposure photography is an exciting and creative way to elevate your images. Whether you’re creating them in-camera or through post-processing, the possibilities are endless. By selecting the right subjects, experimenting with exposure and blend modes, and refining your technique, you can create stunning double exposures that push the boundaries of your photography. So, grab your camera, start experimenting, and unleash your creativity!


